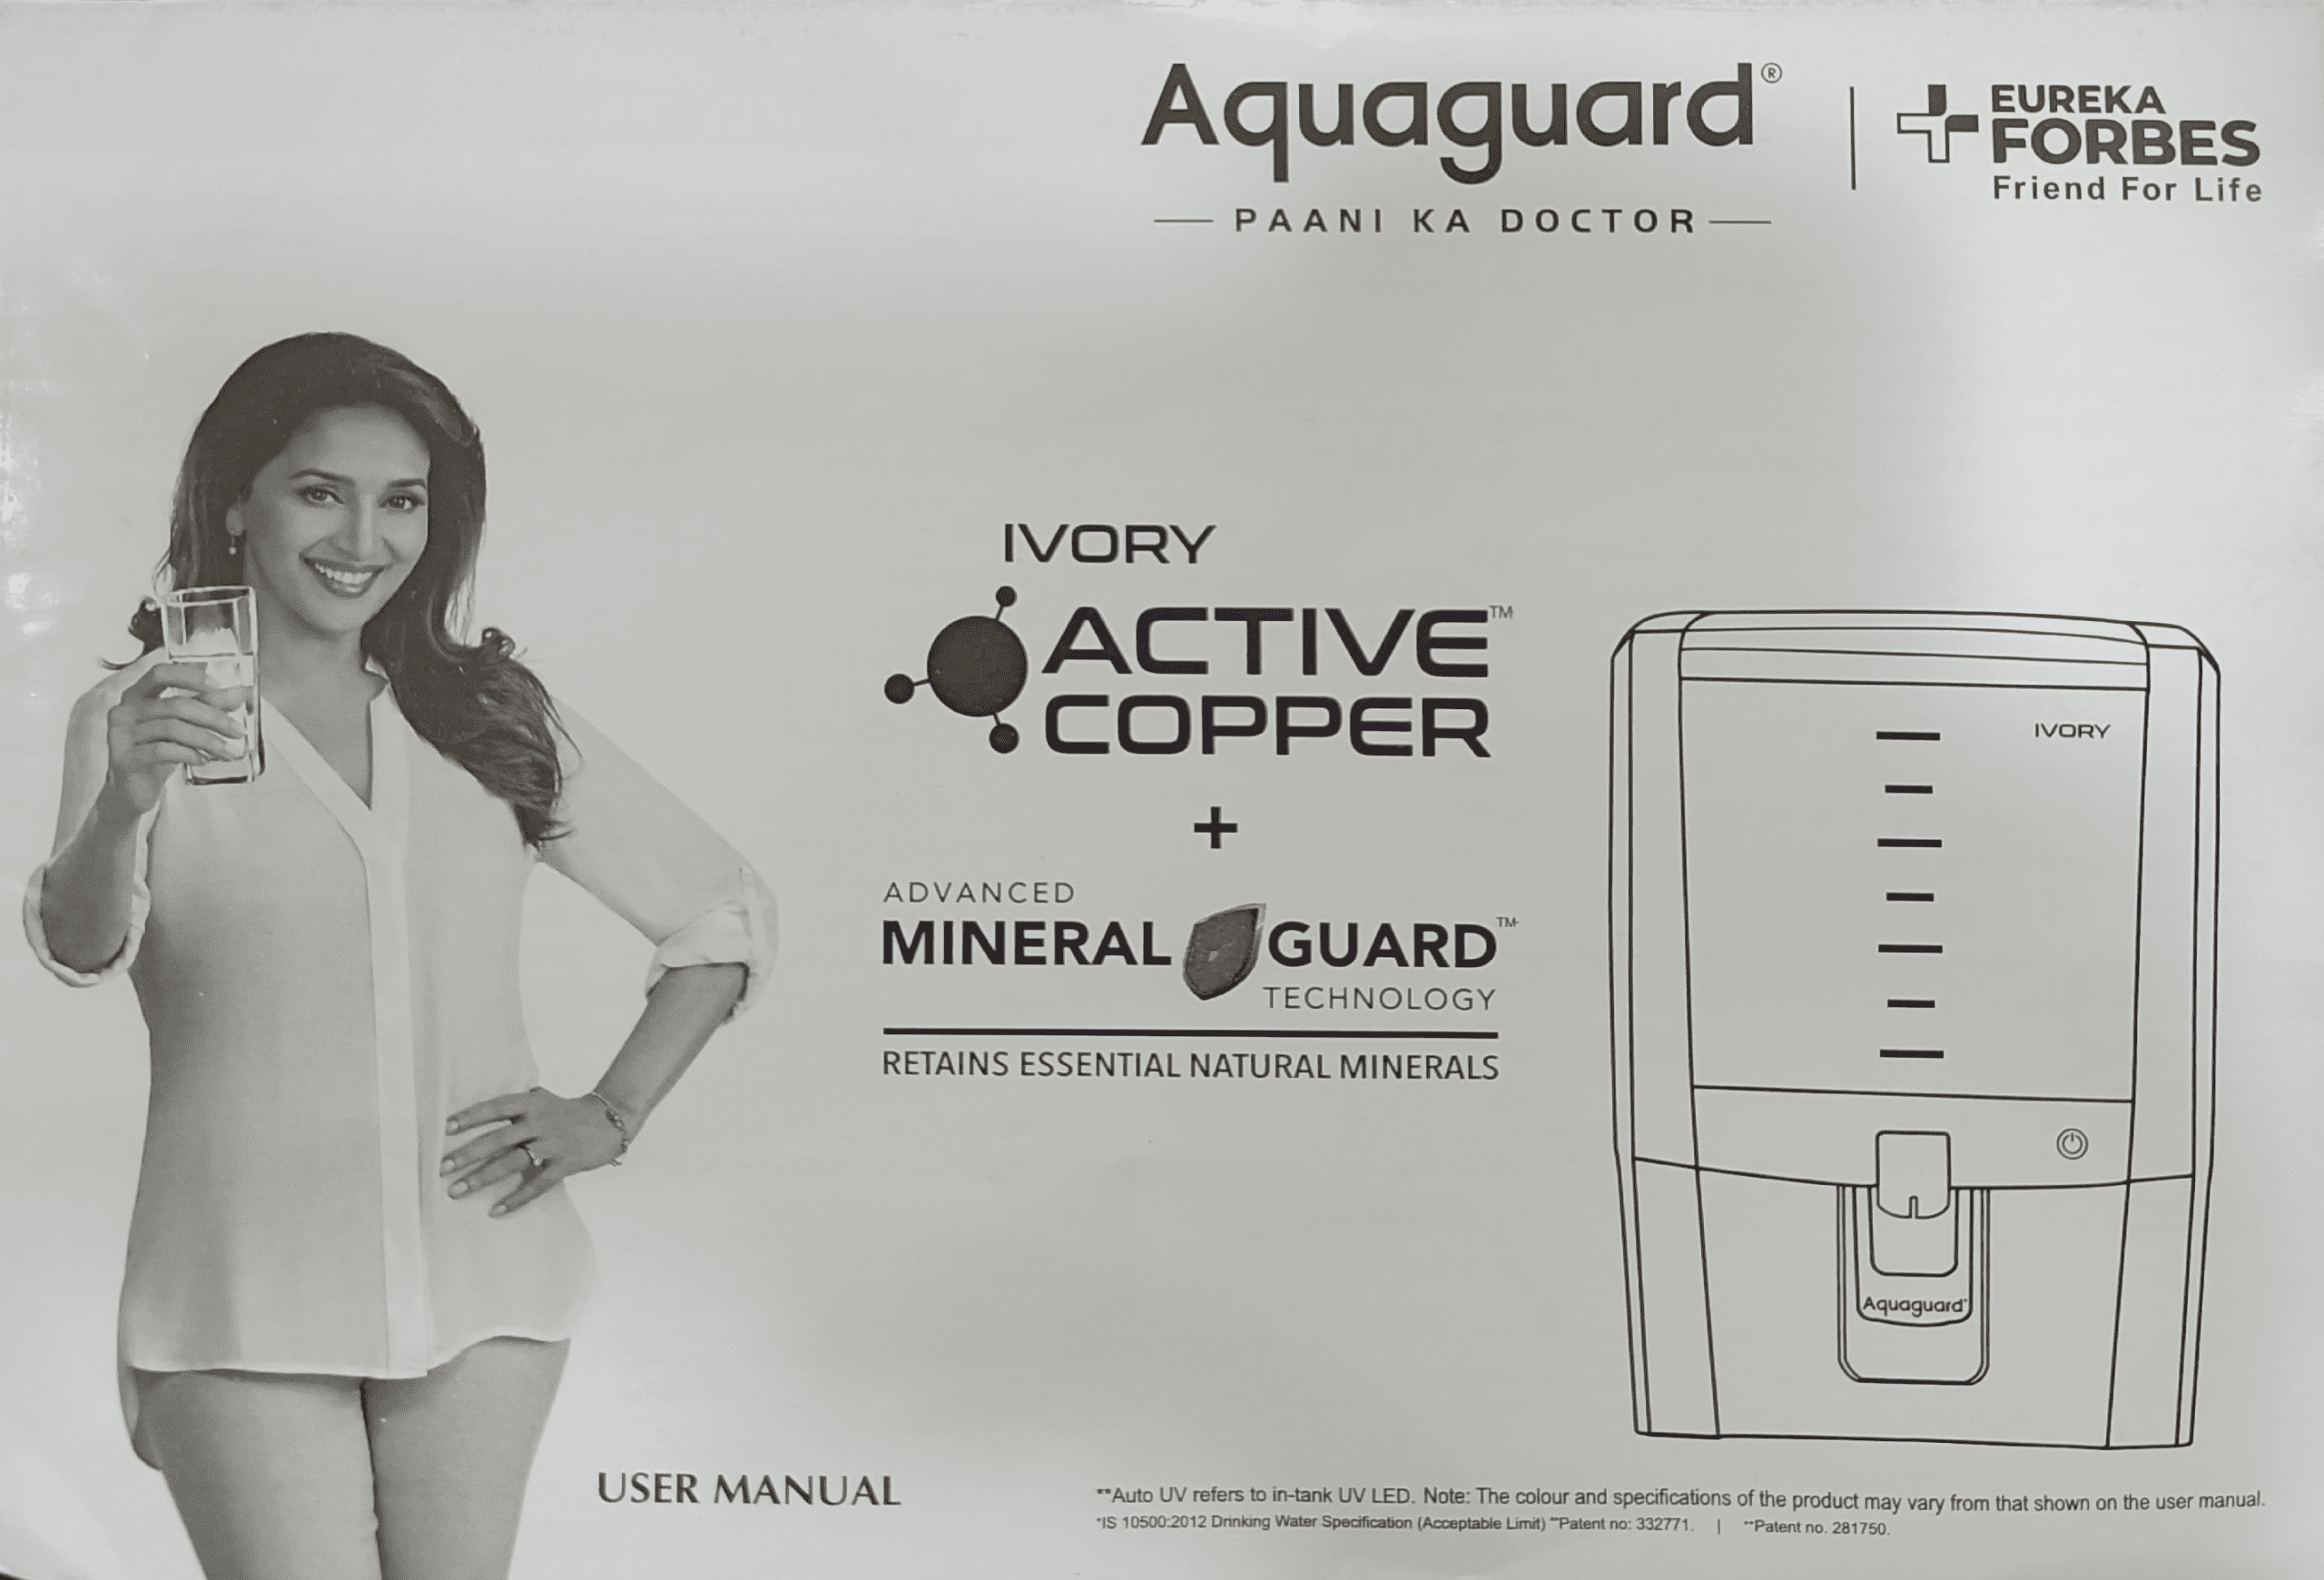
The Aquaguard Ivory installation guide step by step process is crucial for getting safe, clean drinking water from day one. Whether you have the RO+AUTO UV or UV+UF model, proper installation determines water quality, filter lifespan, and system reliability. This guide walks you through testing your water, choosing the right location, understanding pressure requirements, and completing your first run—everything you need to know before your technician arrives or to verify the installation is done correctly.
Pre-Installation: Water Testing and Preparation
Location and Mounting Requirements for Aquaguard Ivory
Choose a cool, dry spot near a kitchen sink or water source with easy access to a power outlet for Aquaguard Ivory installation. The unit needs at least 4-6 inches of clearance around it for maintenance and airflow, and the mounting surface must be flat and sturdy to support the purifier’s weight when full. Ensure the area is away from direct sunlight and heat sources to protect the UV lamp and plastic components. The water supply line should be within 5 feet of the purifier, and the drainage pipe must have a downward slope to prevent backflow. For under-sink models, confirm cabinet height accommodates the unit. Proper placement helps prevent leaks, reduces noise, and ensures efficient operation—key factors that affect long-term performance and filter life. Mounting brackets are included, but a professional may be needed if drilling into tile or granite. This preparation step ensures your Aquaguard Ivory delivers reliable, safe water from day one.
Why test for TDS and hardness before installation
Before installing your Aquaguard Ivory, you must test your input water for Total Dissolved Solids (TDS) and total hardness. This isn’t optional—it determines whether your purifier will work effectively and which model suits your water supply. Testing takes 10 minutes and costs minimal, but skipping it can result in choosing the wrong system for your water conditions.
TDS measures the total concentration of dissolved minerals and salts in your water. High TDS water (over 2000 mg/L for RO+AUTO UV or over 200 mg/L for UV+UF) will overwhelm filters quickly and reduce their lifespan dramatically. Hardness testing reveals calcium and magnesium content, which scaling filters if not managed properly.
Understanding your water quality and choosing right model
Your water testing results determine which Aquaguard Ivory model fits your needs:
| Water Parameter | RO+AUTO UV Model | UV+UF Model |
|---|---|---|
| Maximum TDS | Up to 2000 mg/L | Up to 200 mg/L |
| Maximum Iron Content | 0.3 mg/L (both models) | 0.3 mg/L (both models) |
| Maximum Turbidity | 5 NTU (both models) | 5 NTU (both models) |
| Maximum Chlorine | 0.2 mg/L (both models) | 0.2 mg/L (both models) |
The RO+AUTO UV handles higher TDS water (up to 2000 mg/L) through reverse osmosis membranes that strip dissolved salts. Choose this if your water has high mineral content or you suspect high TDS. The UV+UF model works with lower TDS water (up to 200 mg/L) and relies on ultrafiltration and UV disinfection—best for areas with naturally softer water or lower contamination.
Input water parameters for RO+AUTO UV vs UV+UF
Both Aquaguard Ivory models share most input water requirements but differ in pressure tolerance and TDS capacity. Your local water supply must meet these specifications or pre-treatment is required:
| Parameter | Specification | Reason |
|---|---|---|
| Water Temperature | 10°C to 40°C | Hot water damages filter membranes; cold water slows filtration |
| Chlorine (Max.) | 0.2 mg/L | Excess chlorine damages RO membranes and carbon filters |
| Iron (Max.) | 0.3 mg/L | Iron staining clogs filters and damages membrane surfaces |
| Turbidity (Max.) | 5 NTU | Particles above this clog pre-filters quickly |
The RO+AUTO UV accepts input water pressure between 0.3 to 3.0 kg/cm², while UV+UF works between 0.3 to 2.0 kg/cm². If your tap pressure exceeds the maximum, you’ll need a Pressure Reducing Valve (PRV). If pressure is below 0.3 kg/cm², a booster pump becomes necessary.
When you need pre-treatment: Iron removal and turbidity
If your water testing shows iron content above 0.3 mg/L, install an iron remover as pre-treatment before the Aquaguard Ivory. Iron oxidizes on filter surfaces, creating rust-colored staining and clogging that shortens filter life dramatically. An iron removal cartridge prevents this damage and is cheaper than replacing filters early.
Similarly, if turbidity (cloudiness) exceeds 5 NTU or your water contains visible colloidal particles (clay, algae, sediment), use a special pre-filter cartridge. High turbidity water clogs the i-Filter™ (Aquaguard’s first stage) within weeks instead of lasting the full 6,000-liter service life. A pre-filter handles the heavy particle load, protecting your main unit’s filters.
Optimal Location and Environment Setup
Choosing between kitchen counter and wall mount
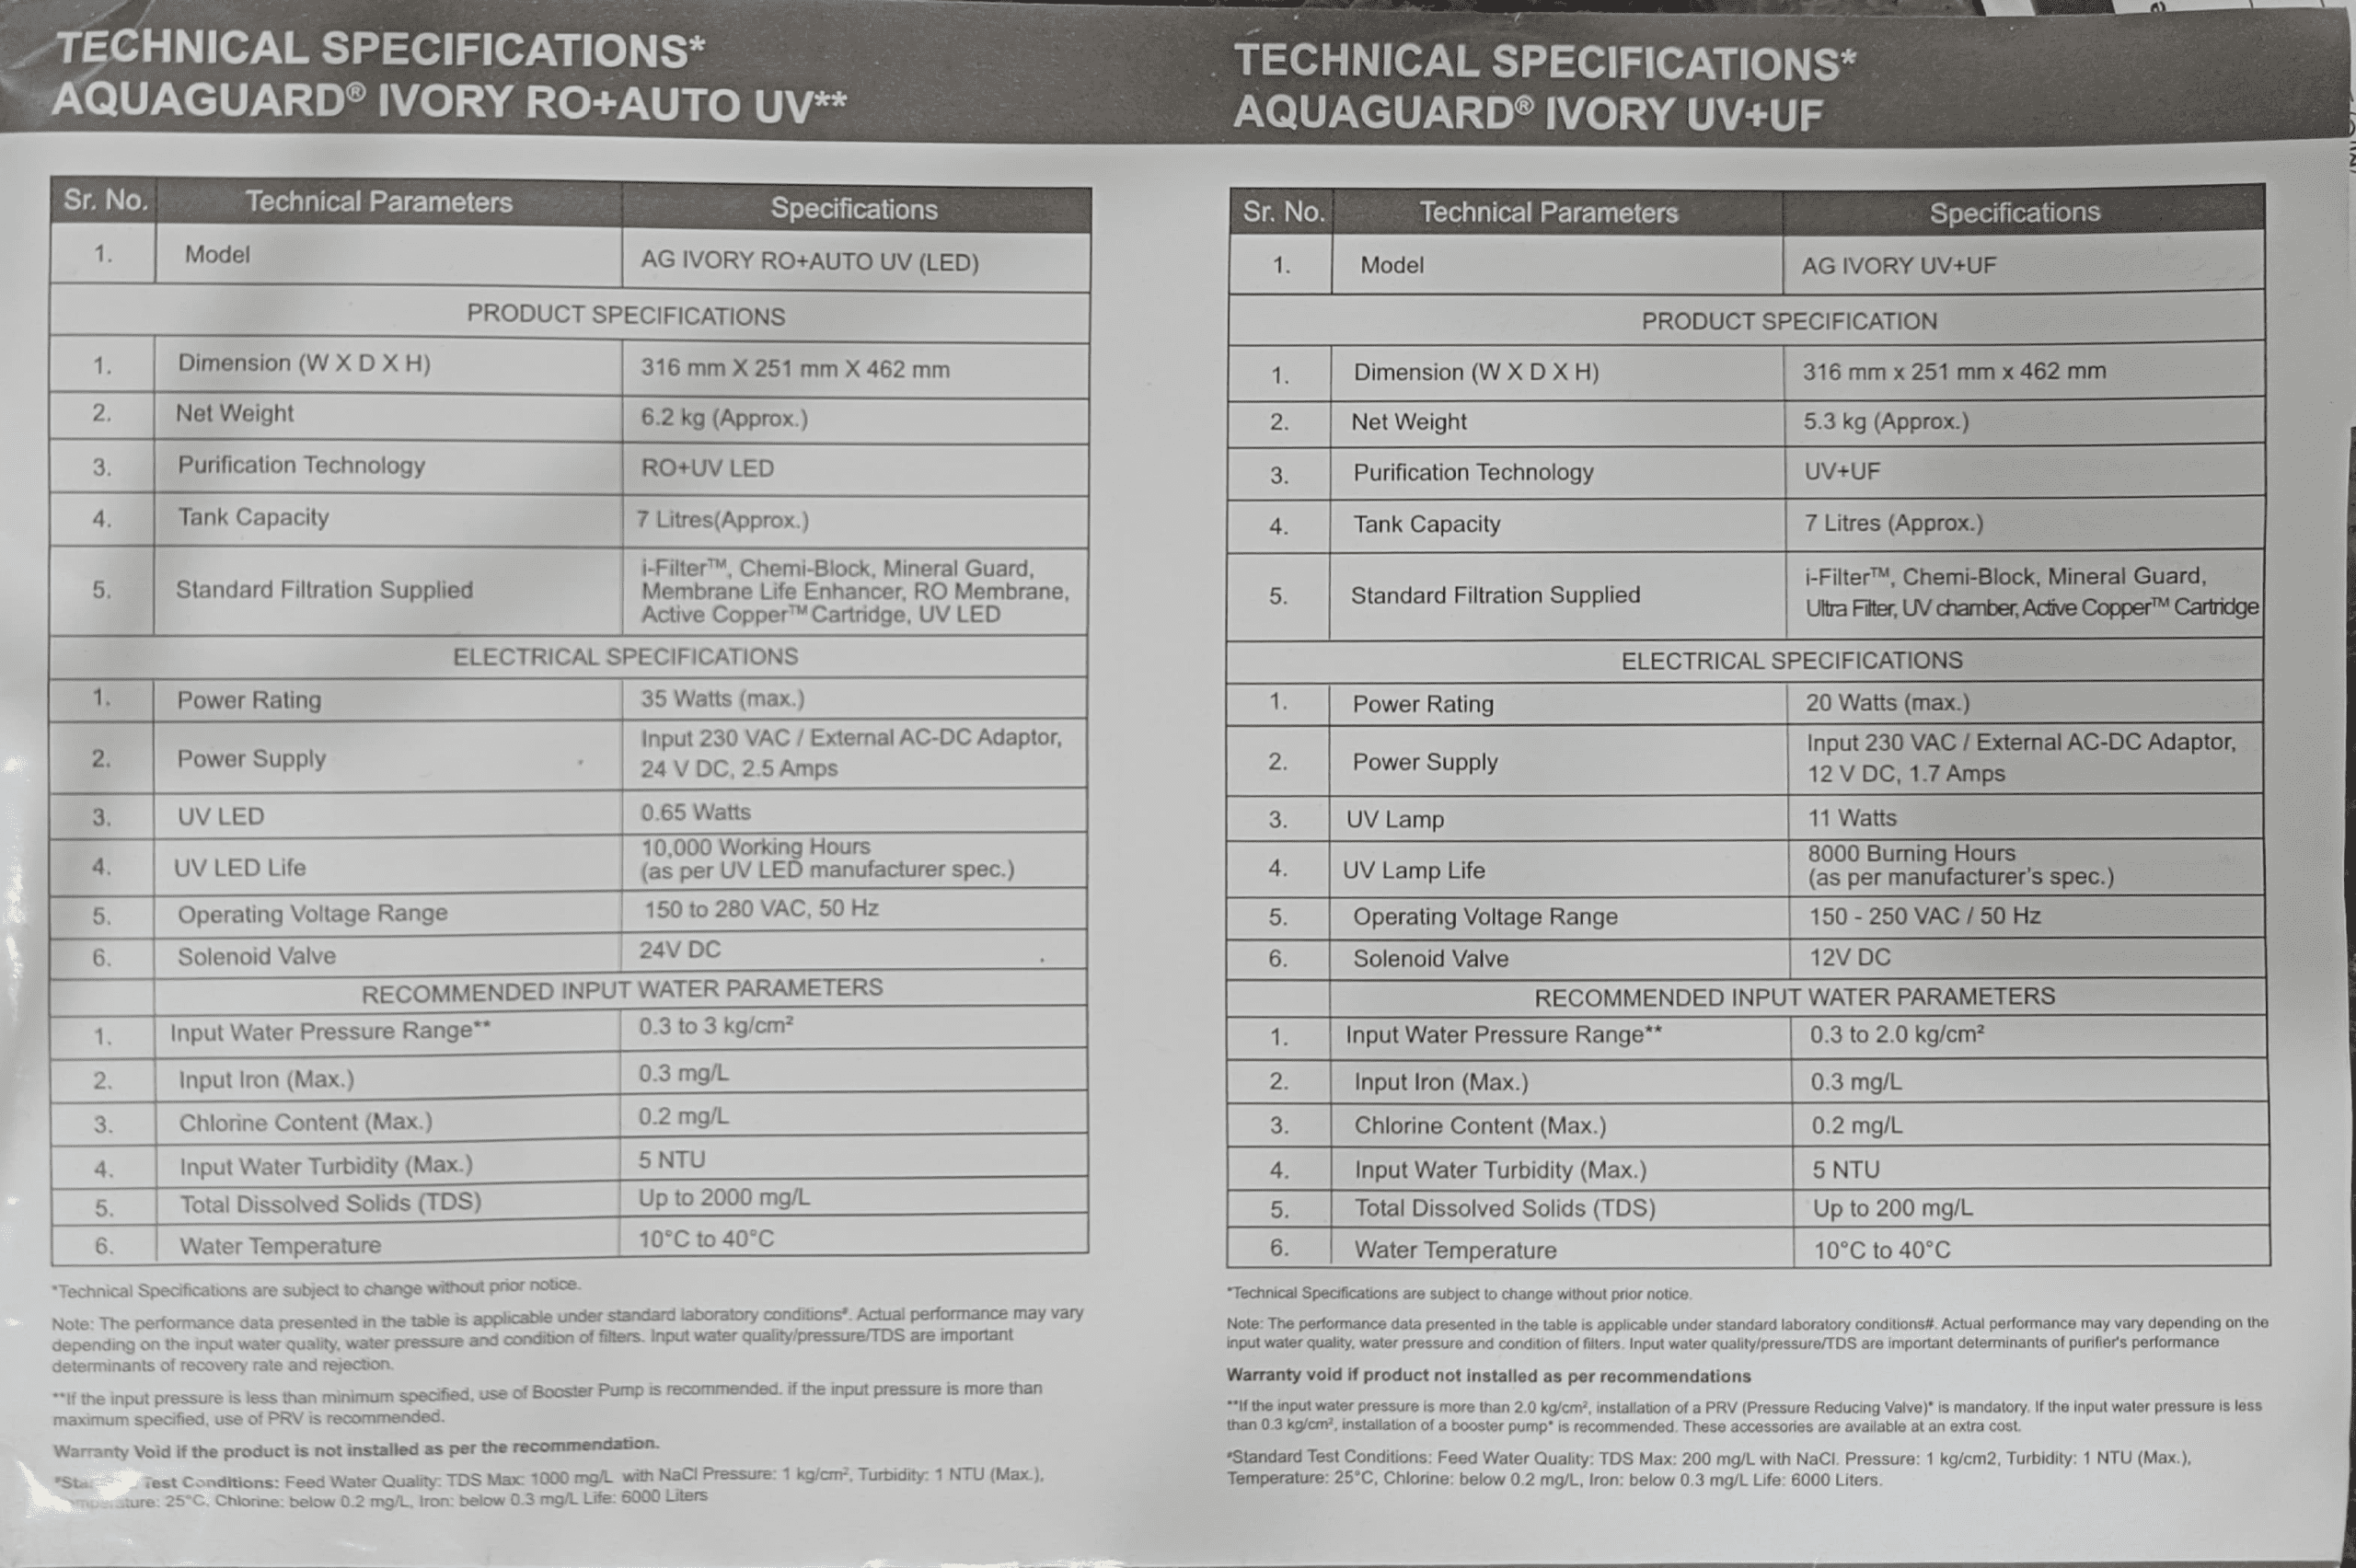
Your Aquaguard Ivory measures 316 mm wide × 251 mm deep × 462 mm tall and weighs 6.2 kg (RO+AUTO UV) or 5.3 kg (UV+UF). Both dimensions and weight support kitchen counter or wall mounting. Counter placement offers easier filter access and visibility of LED indicators. Wall mounting saves counter space but requires secure bracket installation to prevent water damage if the unit falls.
Choose a location near your tap water source to minimize connection tubing length. Longer inlet tubes trap sediment and slow water delivery. If wall mounting, install it 30–40 cm above the counter to allow water containers to fit underneath the outlet tap.
Temperature requirements: 10°C to 40°C range
The Aquaguard Ivory operates safely between 10°C and 40°C ambient temperature. Temperatures below 10°C slow filtration dramatically and can freeze water inside membranes, damaging them permanently. Temperatures above 40°C accelerate filter degradation and UV lamp aging.
In hot climates, avoid installing the purifier in direct sunlight or above heating appliances (stoves, ovens, heaters). Position it in shaded, climate-controlled kitchen areas. In cold regions, ensure your kitchen temperature doesn’t drop below 10°C during winter, or insulate the unit with a protective cover.
Avoiding direct sunlight and heat sources
Direct sunlight degrades plastic components and accelerates UV lamp aging (both models use UV technology). Position your Aquaguard Ivory away from windows or skylights. Keep it at least 30 cm away from direct heat sources like ovens, stoves, or heating vents. Heat causes plastic housings to warp and reduces the effectiveness of UV disinfection.
Ventilation needs for purifier unit
Install your purifier in a dry, well-ventilated area. The unit’s solenoid valve and internal electronics release small amounts of moisture during operation. Poor ventilation traps this moisture, potentially damaging electrical components. Avoid humid, enclosed spaces like bathroom cabinets or sealed cupboards.
Ensure air can circulate around the back and sides of the unit. Leave at least 10 cm of clearance on all sides for proper ventilation and easier filter cartridge replacement. If wall-mounted, maintain this clearance from walls and adjacent appliances.
Understanding Input Water Pressure Requirements
RO+AUTO UV pressure: 0.3 to 3.0 kg/cm² specifications
The RO+AUTO UV model requires input water pressure between 0.3 and 3.0 kg/cm². This range ensures the RO membrane receives adequate pressure to push water through the semipermeable barrier while separating dissolved salts and contaminants. Below 0.3 kg/cm², filtration slows dramatically and water production drops to a trickle. Above 3.0 kg/cm², excessive pressure stresses the membrane and shortens its lifespan from 6,000 liters to 3,000–4,000 liters.
Test your tap water pressure before installation using a pressure gauge (available at hardware stores or from your Eureka Forbes technician). Simply connect the gauge to an outdoor or utility tap near your installation point. Record the reading in kg/cm² (standard metric measurement) or convert PSI to kg/cm² using the formula: 1 kg/cm² ≈ 14.2 PSI.
UV+UF pressure: 0.3 to 2.0 kg/cm² limits
The UV+UF model has stricter pressure limits: 0.3 to 2.0 kg/cm². This lower maximum reflects the ultrafiltration membrane’s sensitivity to pressure—UF membranes are more delicate than RO membranes and operating above 2.0 kg/cm² causes membrane rupture and contamination breakthrough. If your water pressure exceeds 2.0 kg/cm², a Pressure Reducing Valve is mandatory, not optional.
When to install PRV (Pressure Reducing Valve)
A Pressure Reducing Valve (PRV) is mandatory if your input water pressure exceeds the maximum for your model (3.0 kg/cm² for RO+AUTO UV, 2.0 kg/cm² for UV+UF). PRVs cost 500–1,500 rupees and install inline between the main water supply and your purifier inlet. They automatically reduce high pressure to safe levels without affecting water flow.
Install the PRV upstream (before) your purifier if your main water supply pressure consistently reads above maximum. High-rise apartments and areas with municipal water pressure above 3 kg/cm² typically require PRVs. Your Eureka Forbes technician can assess this during installation and add one if needed—never skip this step, as high-pressure damage isn’t covered under warranty.
When booster pump is necessary and recommended
If your input water pressure reads below 0.3 kg/cm², a booster pump is recommended to maintain adequate filtration speed. Low pressure occurs in low-rise buildings, areas far from water mains, or during low-demand hours (early morning, late night). Without sufficient pressure, your purifier takes 2–3 hours to fill the 7-liter tank instead of 20–30 minutes.
Booster pumps (500–2,000 rupees) connect to the inlet line and automatically activate when pressure drops below 0.3 kg/cm². They deliver consistent pressure without over-pressurizing the system. While not mandatory, a booster pump transforms slow filtration into practical daily use. Discuss installation with your technician if you notice slow tank filling during first use.
Input Water Temperature and Connection Setup
Correct tap water temperature range: 10°C to 40°C
Connect your Aquaguard Ivory only to cold water taps. The specified temperature range of 10°C to 40°C is mandatory—never connect to hot water taps, instant heaters, or mixer taps set to warm. Hot water (above 40°C) instantly damages three critical components:
RO Membrane: Temperatures above 40°C warp the thin-film composite membrane, reducing its salt rejection efficiency from 95%+ down to 60–70% within hours. This damage is permanent and not covered under warranty.
Carbon Filters: The Chemi-block cartridge contains activated carbon that degrades rapidly above 40°C, releasing particles into your drinking water instead of filtering them out.
Electronic Components: The microcontroller, solenoid valve, and UV circuitry are rated for 40°C maximum. Hot water exposure causes solder joints to fail and electronics to malfunction.
Why hot water taps damage filters and system
Your Aquaguard Ivory is engineered for cold water (10–40°C ambient + tap water temperature). In India, tap water typically measures 15–25°C during cooler months and 25–35°C during summer. These temperatures are safe. However, instant geysers deliver 50–60°C water, and even bathroom mixer taps often provide 45–50°C warm water. A single hour connected to warm water can damage your purifier permanently.
Always identify your cold water tap before installation. In most homes, the main water supply tap (before splitting to kitchen, bathroom, etc.) delivers cold water. Ask your plumber or technician to confirm the tap’s temperature with a thermometer before connecting the inlet hose.
Tap water pressure testing before connection
Test tap water pressure at the exact point where you’ll connect your purifier inlet hose. Pressure varies across different taps in your home—the kitchen tap may have 1.5 kg/cm², while the bathroom tap might have 3.5 kg/cm². Always test the specific tap you’ll use for your installation.
To test pressure without a gauge, fill a bucket from your tap and note how quickly it fills. Quick fill (bucket full in 10 seconds) indicates pressure around 2–3 kg/cm². Moderate fill (15–20 seconds) suggests 0.8–1.5 kg/cm². Slow, weak flow (30+ seconds) indicates pressure below 0.3 kg/cm² and requires a booster pump. Ask your Eureka Forbes technician to bring a pressure gauge for precise measurement during installation.
Pre-installation flushing and filter preparation
Before connecting your purifier to the water supply, you must flush all filters individually for 3–5 minutes. This removes fine polypropylene particles and manufacturing residue from filter cartridges. Skipping this step allows particles to enter your first glasses of drinking water, causing cloudiness or unpleasant taste.
Flushing procedure:
1. Place your purifier in a sink or under a tap with adequate drainage.
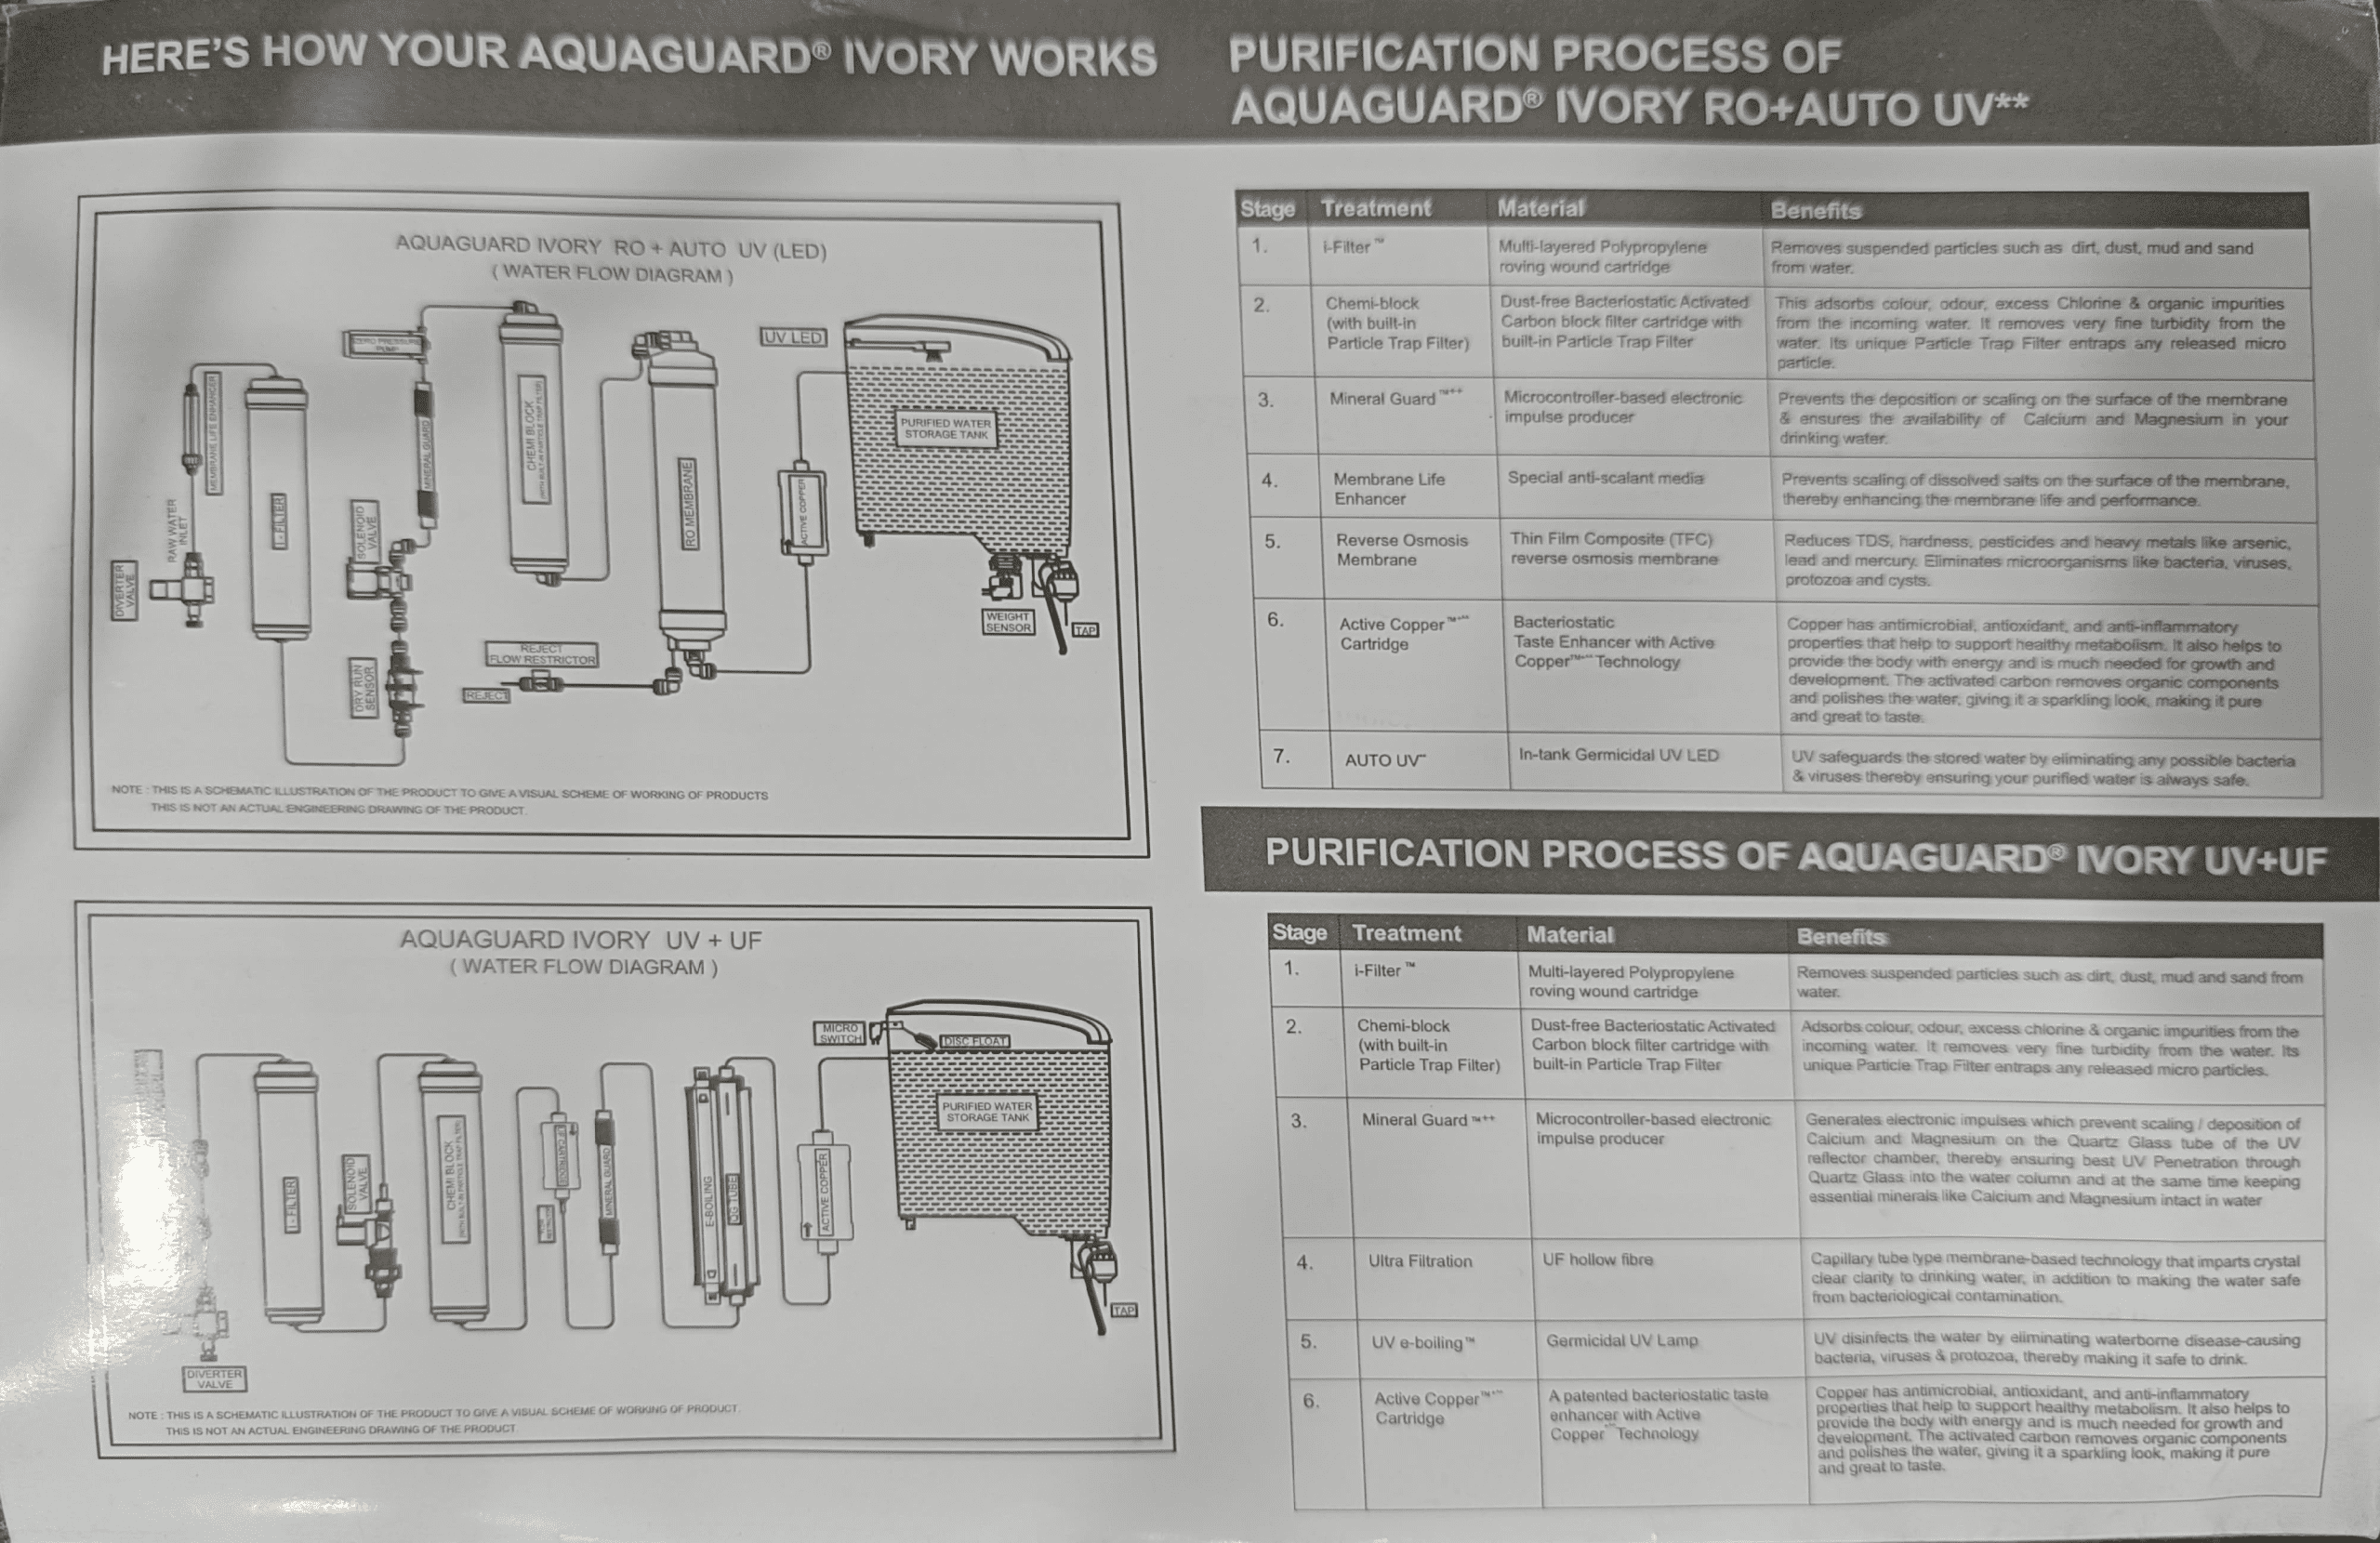
2. Locate the inlet and outlet connection points (shown in your purifier’s water flow diagram).
3. Connect a hose to the inlet and run tap water through the unit directly into the sink for 3–5 minutes at moderate pressure (not full blast).
4. You’ll see white/milky water initially—this is normal and contains filter particles.
5. Stop when water runs clear.
6. Do not connect the purifier to the main supply yet.
Your technician performs this flushing during professional installation. If you’re verifying the installation yourself, ask the technician to demonstrate the flushing process and confirm that milky water cleared before connecting to your permanent water supply.
First Run Procedure and Startup Checklist
Flushing filter for 3–5 minutes: Step-by-step process
After your technician completes the permanent installation (inlet hose connected to your tap, outlet hose running to the storage tank), the purifier is ready for initial flushing. This second flushing removes any particles that settled in tubes or connections during installation.
Step-by-step process:
Step 1: Place an empty bucket or basin under the purifier’s main outlet tap (not the storage tank outlet).
Step 2: Turn on the purifier’s power switch. You’ll see LED lights activate:
RO+AUTO UV: Red, Blue, and Green lights glow sequentially for 1 second each, then Green stays solid for 5 seconds.
UV+UF: Red, Blue, and Green lights glow sequentially for 1 second each, then Green stays solid for 30 seconds.
Step 3: After the LED sequence completes, open the main outlet tap fully and let water flow into your bucket for 3–5 minutes continuously.
Step 4: Observe the water color. Initially, you may see slightly cloudy or white-tinted water—this is normal and contains remaining fine particles from the filters. As you continue flushing, water should become progressively clearer.
Step 5: At the 5-minute mark, close the outlet tap and inspect the water in your bucket. It should be clear and colorless. If water still appears cloudy, open the tap and continue flushing for another 2–3 minutes.
Step 6: Once water runs clear, your filters are flushed and ready for drinking water production.
Running purifier 5–10 minutes after installation
After initial filter flushing, run the purifier for another 5–10 minutes to fill the storage tank. This ensures the entire system (inlet tubing, filters, outlet tubing, and tank) is filled with purified water. The storage tank (7 liters capacity in both models) typically fills in 20–40 minutes depending on your water pressure and which model you have—RO+AUTO UV produces water slightly slower due to the reverse osmosis process than UV+UF.
Watch the LED indicators during this fill:
RO+AUTO UV LED during tank filling: Blue light blinks at 0.5-second intervals (on-off-on-off). When the tank reaches full capacity, the Blue light transitions to solid (continuous glow without blinking).
UV+UF LED during tank filling: Blue light blinks at 0.5-second intervals. When full, Blue light becomes solid.
The automatic shut-off activates once the tank reaches full capacity, stopping water production and preventing overflow. You’ll notice water flow stops at the outlet—this is normal and indicates your tank is full.
When to drain water and avoid early consumption
Do not drink the water produced during the first 5–10 minutes after installation. This water may contain residual particles from manufacturing, flushing, or system activation. Drain this entire first tank of water by opening the storage tank’s outlet tap fully and letting it run into a bucket or sink until the tank is empty.
This precaution removes any fine particles that escaped flushing and ensures your first consumed water is truly pure. Allow the tank to refill (20–40 minutes depending on pressure and model), and then this second tank of water is safe to drink.
First consumption timeline:
• 0–5 minutes: Filter flushing (discard)
• 5–40 minutes: Initial tank fill (discard)
• 40+ minutes: Second tank fill (safe to drink)
Tank disinfection and system activation
Before consuming water for the first time, your storage tank must be disinfected. While your tank is manufactured clean, disinfection ensures any bacteria present during shipping or installation is eliminated. This is a mandatory step performed by authorized Eureka Forbes technicians during professional installation.
Disinfection process:
1. After the initial tank fill, drain all water from the tank completely.
2. Switch the purifier OFF from the main power supply.
3. Open the tank’s top cover and wipe the inside with a dry, clean soft cloth to remove any dust.
4. Replace the top cover and switch power ON.
5. Allow the tank to fill again (20–40 minutes).
6. Open the tank’s top cover and drop one Disinfection Tablet (supplied with your purifier or purchased from an Eureka Forbes service center) into the filled tank.
Important: Keep Disinfection Tablets away from children and do not consume the tablet.
7. Replace the top cover and leave the unit undisturbed for 30 minutes. The tablet dissolves and disinfects the entire tank.
8. After 30 minutes, open the main outlet tap and discard the first full tank of water (including the disinfected water). Do not drink this water.
9. Allow the tank to refill a second time (20–40 minutes).
10. Your system is now fully activated and ready for safe consumption.
If you notice a medicinal taste or smell in the water after disinfection, discard the tank and refill once more. This eliminates any residual disinfectant taste. Your water is now ready for daily drinking use.

LED Indicator Guide for Your Aquaguard Ivory
Your purifier’s LED lights communicate its operating status and alert you to problems. Understanding these indicators prevents confusion and helps you identify issues early.
| LED Color/Status | RO+AUTO UV Meaning | UV+UF Meaning | Action Required |
|---|---|---|---|
| Red, Blue, Green (sequential 1 sec each) | Power ON startup sequence | Power ON startup sequence | Normal—wait for sequence to complete |
| Green (solid) | System ready, purification standby | Active purification mode (30 secs) | Normal operation |
| Blue (blinking 0.5 sec rate) | Tank filling in progress | Tank filling in progress | Normal—wait for tank to fill |
| Blue (solid) | Tank full, water production stopped | Tank full, water production stopped | Normal—tank has reached capacity |
| Red (solid) | UV LED error or component failure | UV lamp error or component failure | Contact Eureka Forbes service technician |
| Red (blinking 0.5 sec) | Solenoid valve/pump short circuit | Solenoid valve short circuit | Contact Eureka Forbes service technician |
| Purple (solid) | DRS (Dry Run System) activated | LPS error (low pressure switch) | Check water supply and pressure; contact technician if issue persists |
| Red (blinking 0.25 sec—rapid) | Electronic authentication error (non-genuine cartridge) | Electronic authentication error | Use only genuine Eureka Forbes cartridges; purification halts until corrected |
| White (blinking slowly) | Filter life first warning (near 6,000 liters) | Filter life first warning | Schedule filter replacement within 1–2 weeks |
| White (blinking fast) | Filter life EOL (end of life reached) | Filter life EOL (end of life reached) | Unit halts purification; contact technician immediately for cartridge replacement |
The electronic authentication system in both models detects non-genuine cartridges and halts operation to protect you from unsafe water. Always use Eureka Forbes genuine cartridges—knockoff filters bypass this safety feature and deliver unfiltered water.
Technical Specifications Summary
| Specification | RO+AUTO UV | UV+UF |
|---|---|---|
| Dimensions (W×D×H) | 316 × 251 × 462 mm | 316 × 251 × 462 mm |
| Weight | 6.2 kg | 5.3 kg |
| Tank Capacity | 7 liters | 7 liters |
| Power Rating | 35 Watts (max) | 20 Watts (max) |
| Input Pressure Range | 0.3–3.0 kg/cm² | 0.3–2.0 kg/cm² |
| Max TDS (Input Water) | 2000 mg/L | 200 mg/L |
| Operating Temperature | 10–40°C | 10–40°C |
| UV LED/Lamp Life | 10,000 hours (LED) | 8,000 hours (lamp) |
| Filter Service Life | 6,000 liters (all cartridges) | 6,000 liters (all cartridges) |
Frequently Asked Questions
What water pressure do I need for my Aquaguard Ivory installation?
Your Aquaguard Ivory requires input water pressure between 0.3 to 3.0 kg/cm² for RO+AUTO UV models or 0.3 to 2.0 kg/cm² for UV+UF models. Pressure below 0.3 kg/cm² requires a booster pump for acceptable filtration speed. Pressure above the maximum requires a Pressure Reducing Valve (PRV) to prevent membrane damage. Test your tap water pressure with a gauge before installation to ensure it falls within the safe range. Contact your Eureka Forbes technician to install PRV or booster pump if your pressure falls outside these limits.
Can I connect my Aquaguard Ivory to a hot water tap?
No—never connect your Aquaguard Ivory to hot water taps or instant geysers. Your purifier is designed only for cold water between 10°C and 40°C. Hot water (above 40°C) permanently damages the RO membrane, carbon filters, and electronic components within hours. Always connect to the main cold water supply tap before any splitting to kitchen or bathroom hot lines. Verify the tap temperature with a thermometer before professional installation to ensure safe operation.
How do I know if my water needs pre-treatment before installing the Aquaguard Ivory?
Test your input water for iron content and turbidity before installation. If iron content exceeds 0.3 mg/L, install an iron remover cartridge before your Aquaguard Ivory to prevent rust staining and filter clogging. If turbidity (cloudiness) exceeds 5 NTU or water contains visible colloidal particles (clay, sediment), use a special pre-filter cartridge to protect your main unit’s filters. Water testing kits are available from hardware stores or your Eureka Forbes service center. High iron or high turbidity water shortens filter lifespan dramatically without pre-treatment.
What should I do if water doesn’t flow into my storage tank after installation?
First, verify that your overhead water tank is filled and the main water supply tap is fully open. Check that inlet and outlet hoses are properly connected and not kinked or bent. If water pressure is very low (below 0.3 kg/cm²), installation of a booster pump may be necessary—contact your Eureka Forbes technician. If water still doesn’t flow after checking these points, contact an authorized service center immediately. Do not attempt to disassemble or repair the unit yourself, as this voids your warranty.
When should I change the filter cartridges in my Aquaguard Ivory?
All filter cartridges (i-Filter™, Chemi-block, Active Copper™, RO Membrane, and UF Filter) have a service life of 6,000 liters or approximately 6–12 months of regular use, whichever comes first. Your purifier’s White LED light blinks slowly when filters approach end-of-life and blinks rapidly when they reach 6,000 liters. Schedule replacement with an authorized Eureka Forbes technician immediately when White LED warnings appear. Continuing to use expired cartridges results in contaminated water. Use only genuine Eureka Forbes replacement cartridges—non-genuine filters trigger electronic authentication errors and halt purification.