Common Image Problems and Quick Fixes
A shaky, vibrating, off-center, or flickering image on your Philips monitor is a timing issue. The monitor’s internal clock isn’t perfectly synchronized with the pixel data from your computer. These are standard problems with a clear troubleshooting path, from a one-button fix to precise manual controls.
Incorrect Display Position
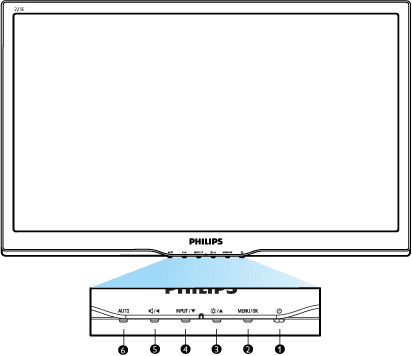
An image that’s shifted or appears to wobble is a sync problem. The monitor can’t align the incoming video signal with its physical pixel grid. The manual for the Philips 24-inch 100Hz model specifies two causes. First, ensure your VGA cable is fully seated at both the monitor and your PC—a loose connection destabilizes the analog signal. The primary fix is to press the monitor’s Auto button, which triggers an automatic horizontal and vertical position calibration. If the image remains off-center after using Auto, you must manually adjust the Phase and Clock settings in the On-Screen Display (OSD).
Vertical or Horizontal Flicker/Bars
Thin, shimmering lines across the screen are another symptom of incorrect timing. The manual groups these issues together: the first corrective step for both is pressing the Auto button. This function recalibrates the monitor’s sampling clock to match the signal’s data rate, which often eliminates the bars. If vertical bars persist, the manual directs you to the OSD’s More Settings menu to eliminate them using the Phase and Clock controls.
How to Use the Auto Adjustment Button
The Auto button is a one-touch synchronization fix. It’s the fastest solution for shaking, off-center images, and flickering bars. Understanding its function and limitations ensures you use it correctly.
What the Auto Button Does
Pressing Auto triggers an automatic adjustment of the monitor’s Clock and Phase settings. Clock corrects the sampling frequency to match the incoming pixel data rate, fixing horizontal instability and vertical bars. Phase adjusts the precise timing of when that data is sampled, correcting vertical instability, horizontal bars, and fine-tuning image position. It’s optimized for standard PCs outputting common resolutions like the monitor’s native 1920×1080 at 60Hz or 100Hz.
When Auto Might Not Work
The Auto function has defined limits. The manual states it may fail with “nonstandard PC or video card” signals. This includes legacy graphics cards, certain professional GPUs, or devices like game consoles and single-board computers connected via adapters. These sources can output timing signals outside the standard VESA range the Auto logic expects. If pressing Auto doesn’t resolve the shaking or makes it worse, proceed to manual OSD adjustments.
Manual Adjustments via the On-Screen Display (OSD)
When Auto fails, manual control of Clock and Phase is your solution. These are the direct parameters that govern image stability and positioning.
Accessing the OSD Menu
Use the front-panel buttons to navigate. Press the Menu button, then navigate to the “More Settings” submenu. Here you’ll find the “Clock” and “Phase” adjustments. These are the manual levers for the same synchronization the Auto button attempts automatically.
Adjusting Phase and Clock Settings
Adjust Clock first for major horizontal issues, then Phase for fine-tuning. Follow this sequence:
- Select the “Clock” setting in the More Settings OSD menu.
- Adjust the Clock value incrementally. Your goal is to stop any broad vertical bars or a horizontally “swimming” image. The image may stabilize but remain slightly blurry.
- Navigate to the “Phase” setting. This works in tandem with Clock.
- Adjust the Phase value slowly. This sharpens the image and eliminates fine horizontal flicker or shimmering vertical lines. You’ll see individual pixels snap into focus.
- Iterate between Clock and Phase a few times until the image is perfectly stable and sharp.
The manual is explicit: for an incorrect display position or persistent flicker, the definitive correction is manual adjustment of Phase and Clock after checking cables and trying Auto.
Frequently Asked Questions
What if manual Clock and Phase adjustments don’t fix the shaking?
First, reseat your VGA cable at both ends—the manual specifically cites this for a vibrating image. If possible, test with a different, high-quality VGA cable, as a damaged cable can corrupt the analog timing signals. If the problem continues with a secure, known-good cable, the issue likely originates from your computer’s graphics output.
Is image shaking a sign my monitor is failing?
Rarely. These are almost always signal synchronization issues, not hardware failure. The manual differentiates these from permanent pixel anomalies: “green, red, blue, dark, or white dots” are a normal characteristic of the LCD panel and not a defect. Physical cracks or large, spreading dark areas indicate physical damage.
Why did my image become shaky when it was fine before?
A sudden change points to a signal alteration. Common causes include switching to a non-standard resolution or refresh rate on your PC, a graphics driver update, or a cable that worked loose. After any such change, press the Auto button first to force a re-sync.
Do I need to adjust settings when switching between HDMI and VGA?
Yes. Each input has independent timing profiles. An image perfectly synced on HDMI may be off-center on VGA. Select the problematic input and perform the Auto adjustment or manual Clock/Phase tweaks specifically for that input. The monitor saves these settings per input.
The Auto button worked before but doesn’t now. Why?
This typically means you’ve connected a new, nonstandard device (like a game console or media streamer) whose signal timing falls outside the Auto function’s correction range. Alternatively, your PC’s graphics card could be failing and outputting an erratic signal. Test with a standard PC source or use manual OSD adjustments for the problematic device.
Should I worry about after-images or screen burn-in?
The manual clarifies this. A temporary after-image from a static display is characteristic of the liquid crystal and will fade. It states, “When a fixed image is displayed for a long time, the image may leave an after-image on the screen. This is not a malfunction and will disappear after a few hours.” Only permanent physical damage constitutes a failure.
Official Documentation
Want the full specifications and manufacturer instructions? Download the official Philips 24 inch 100Hz Computer Monitor, Frameless Full HD (1920 x 1080), VESA, HDMI x1, VGA Port x1, Eye Care, 4 Year Advance manual (PDF).
